I recently wrote a signup form and wanted to share how I did it. It shows how to use some of the more advanced features of React-Hook-Form with RedwoodJS. Redwood has its own @redwoodjs/form package. Under the hood it's using react-hook-form. For a lot of use cases using what's available through the RW package will be all you need. But if you need more control, you can import from the react-hook-form package directly and use everything available there.
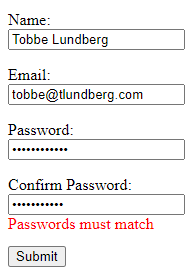
This is what we'll build

Let's start with a new Redwood project and generate a signup page to add our form to.
yarn create redwood-app signup-example
cd signup-example/
yarn rw g page signup
Open up SignupPage.js in your code editor of choice and change it to look like this
import {
  Form,
  TextField,
  EmailField,
  PasswordField,
  Label,
  Submit,
} from "@redwoodjs/forms";

const SignupPage = () => {
  const onSubmit = (data) => {
    console.log("Submitted form with data", data);
  };

  return (
    <Form onSubmit={onSubmit}>
      <Label name="name">Name:</Label>
      <TextField name="name" />

      <Label name="email">Email:</Label>
      <EmailField name="email" />

      <Label name="password">Password:</Label>
      <PasswordField name="password" />

      <Label name="password_confirm">Confirm Password:</Label>
      <PasswordField name="password_confirm" />

      <Submit>Submit</Submit>
    </Form>
  );
};

export default SignupPage;
And just to make it display a tiny bit better we'll add some CSS rules to index.css
label,
button,
input {
  display: block;
}

label,
button {
  margin-top: 1em;
}

span {
  color: red;
}
Now you have a basic form you can use to let users signup on your website. Enter some data and press Submit and you'll see everything printed to the web browser console.
Next thing I wanted to do was to add some validation to the form. We want to make all fields required.
For this we can use the regular html5 required attribute, like so
return (
  <Form onSubmit={onSubmit}>
    <Label name="name">Name:</Label>
    <TextField name="name" required />

    <Label name="email">Email:</Label>
    <EmailField name="email" required />

    <Label name="password">Password:</Label>
    <PasswordField name="password" required />

    <Label name="password_confirm">Confirm Password:</Label>
    <PasswordField name="password_confirm" required />

    <Submit>Submit</Submit>
  </Form>
);
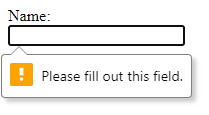
Now, if you try to submit the form without filling in all the fields we'll see something like this

But Redwood can do much better than that! Let's switch over to @redwood/forms' custom validation. One gotcha here is that you have to switch all fields over, you can't just add custom validation to one field, to try it out. If you do, the form will get confused. So you have to pick one way or the other for all your form fields.
Change your code to look like this to get "required" validation with custom messages.
return (
  <Form onSubmit={onSubmit} noValidate validation={{ mode: "onBlur" }}>
    <Label name="name">Name:</Label>
    <TextField name="name" validation={{ required: "Name is required" }} />
    <FieldError name="name" />

    <Label name="email">Email:</Label>
    <EmailField name="email" validation={{ required: "Email is requried" }} />
    <FieldError name="email" />

    <Label name="password">Password:</Label>
    <PasswordField
      name="password"
      validation={{
        required: "You must choose a password",
      }}
    />
    <FieldError name="password" />

    <Label name="password_confirm">Confirm Password:</Label>
    <PasswordField
      name="password_confirm"
      validation={{ required: "You have to confirm your password" }}
    />
    <FieldError name="password_confirm" />

    <Submit>Submit</Submit>
  </Form>
);
As you can see we removed required and added validation instead. required is a regular html attribute, and validation is a prop from @redwoodjs/forms. As I mentioned earlier @redwoodjs/forms uses react-hook-form under the hood, and that validation syntax we used here would have looked something like this if done with r-h-f instead: ref={register({ required: 'Name is required' })}. This can be good to know when reading the r-h-f docs to try to figure out how to do something more advanced. We also added noValidate to the form, because we don't want the html5 validation now that we've added our own. Also configured to validation to trigger on blur.
The email is really important, so I wanted to add a bit more strict verification for that field. It's obviously not bullet-proof, but it's better than nothing.
<EmailField
  name="email"
  validation={{
    required: 'Email is required',
    pattern: {
      value: /[^@]+@[^.]+\..{2,}/,
      message: 'Please enter a valid email address',
    },
  }}
/>
I decided to keep my password validation rules really simple. All I require is that the passwords are at least 10 characters long.
<PasswordField
  name="password"
  validation={{
    required: "Password is required",
    minLength: {
      value: 10,
      message: "Password must be at least 10 characters long",
    },
  }}
/>
The final thing I wanted to add is probably the most interesting and that's validation to make sure "Password" and "Confirm Password" matches. For this we need to use the watch method from react-hook-form. It's available as part of what you get back from the useForm() hook.
These are the parts you need to set it up.
First a couple of new imports.
import { useRef } from 'react'
import { useForm } from 'react-hook-form'
Here we use the imports from above. useForm() is from react-hook-form and gives us full control over the form. Normally @redwoodjs/forms set this up for us, but now we need our own, to set up a watch on the password. We store the watched value in a ref we get from React's useRef(). When you add a watch you're going to introduce more re-renders. But only when that watched field changes, not when any other field in the form changes.
const formMethods = useForm()
const password = useRef()
password.current = formMethods.watch('password', '')
As I said, we're now using our own formMethods, so we have to let Redwood know to use that one, and not create one of its own.
<Form
  onSubmit={onSubmit}
  noValidate
  validation={{ mode: 'onBlur' }}
  formMethods={formMethods}
>
Finally, for the validation, we add a custom validate method to the validation object. These custom validate methods receive the current field value as a parameter, and should return true when the field is valid, and false or a string when the field is not valid. The string, if that's what you return, will be the error message displayed for that field.
You can read more about validate and all other validation possibilities in the r-h-f docs: https://react-hook-form.com/api#register
<PasswordField
  name="password_confirm"
  validation={{
    required: 'You must confirm your password',
    validate: (value) =>
      value === password.current || 'Passwords must match',
  }}
/>
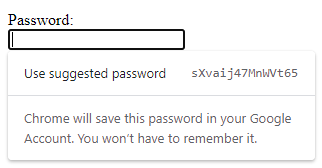
There is one more thing I wanted to add. Since this is a signup page where the user should pick a new password I want the browser to show the password suggestion box.

The browser will try to figure out by context if it should show that box or not. And often it does the right thing. But there's no need for us to leave it to chance. If we tell the browser this is a new-password field it knows to show that ui. It's also helpful to tell the browser what field is the user name. We do this by setting autoComplete="new-password" and autoComplete="username" respectivly. Read more about these and many more options at MDN
So this is the password field, notice the autoComplete attribute at the end
<PasswordField
  name="password"
  validation={{
    required: 'Password is required',
    minLength: {
      value: 10,
      message: 'Password must be at least 10 characters long',
    },
  }}
  autoComplete="new-password"
/>
Wrapping it all up, here's the full SignupPage.js
import { useRef } from 'react'
import { useForm } from 'react-hook-form'
import {
  Form,
  TextField,
  EmailField,
  PasswordField,
  Label,
  Submit,
  FieldError,
} from '@redwoodjs/forms'

const SignupPage = () => {
  const formMethods = useForm()
  const password = useRef()
  password.current = formMethods.watch('password', '')

  const onSubmit = (data) => {
    console.log('Submitted form with data', data)
  }

  return (
    <Form
      onSubmit={onSubmit}
      noValidate
      validation={{ mode: 'onBlur' }}
      formMethods={formMethods}
    >
      <Label name="name">Name:</Label>
      <TextField name="name" validation={{ required: 'Name is required' }} />
      <FieldError name="name" />

      <Label name="email">Email:</Label>
      <EmailField
        name="email"
        validation={{
          required: 'Email required',
          pattern: {
            value: /[^@]+@[^.]+\..{2,}/,
            message: 'Please enter a valid email address',
          },
        }}
        autoComplete="username"
      />
      <FieldError name="email" />

      <Label name="password">Password:</Label>
      <PasswordField
        name="password"
        validation={{
          required: 'Password is required',
          minLength: {
            value: 10,
            message: 'Password must be at least 10 characters long',
          },
        }}
        autoComplete="new-password"
      />
      <FieldError name="password" />

      <Label name="password_confirm">Confirm Password:</Label>
      <PasswordField
        name="password_confirm"
        validation={{
          required: 'You must confirm your password',
          validate: (value) =>
            value === password.current || 'Passwords must match',
        }}
        autoComplete="new-password"
      />
      <FieldError name="password_confirm" />

      <Submit>Submit</Submit>
    </Form>
  )
}

export default SignupPage
(Header photo by Paulius Dragunas on Unsplash)